Battery Disconnect Switch Safety Hazards
Why Quality Battery Disconnect Switches Matter: Avoiding Hidden Fire Hazards
A battery disconnect switch is a critical safety component for RVs, vans, boats, and off-grid systems. But the ones you see most often—budget, red/black plastic switches widely sold online—can hide serious risks inside.
The Problem With Budget Switches
In our testing at a 175 A continuous load, a common budget disconnect switch climbed from ~18 °C to 106.8 °C in just 12 minutes. At those temperatures, cable insulation discolored and the surface became a burn hazard.
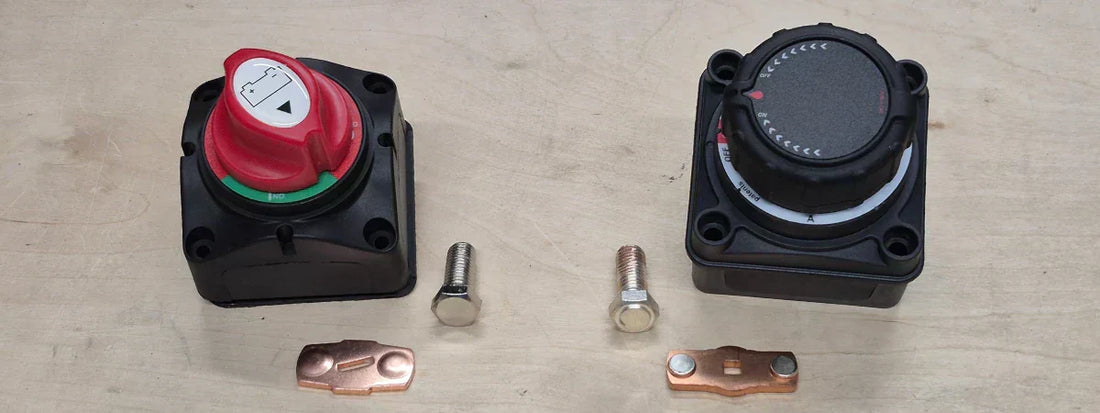
- Connection points: Low-conductivity studs and alloy nuts add resistance where the cable lugs clamp.
- Internal contact: A contact bar with small rounded bumps makes uneven contact, concentrating heat at tiny points.
- Two-stud path: Power flows in one stud and out the other—weak materials effectively double the heating.

Larger, flat contact surfaces minimize resistance and heat (right).
Notice the obviously thicker copper bar as well.
What this shows: The budget switch touches in a few tiny spots. Current crowds through those points, resistance rises, and temperature spikes. The better design mates evenly, keeping resistance and heat low.

Why the lug interface matters: The lug face and the nut/stud surfaces must be clean, flat, and conductive. Alloys and rough finishes add tiny gaps and oxides—each adds a little resistance. At 100–200 A, those “little bits” become steady heaters right next to plastic.

Thermal Evidence: Budget Switch (12 minutes)

How Heat Builds Up in a Switch (Plain English)
Electrical current meets resistance at every contact point. If those points are made from poor metals, have small touch areas (bumps), or aren’t clamped flat, their resistance is higher. High current through small, resistive spots creates concentrated heating. Inside a plastic housing, that heat doesn’t leave quickly, so temperatures climb and spread into the studs, internal parts, and nearby cable insulation.
- Small area = higher resistance: Tiny contact bumps force all the current through little pinpoints.
- Two studs = two heaters: The current path uses an “in” and an “out” stud—bad materials double the heat problem.
- Trapped heat: Plastic housings and enclosed geometry shed heat poorly, so temperatures keep rising.
- Risk cascade: Hot studs warm the cable lugs and jackets; softened insulation increases the risk of shorts and fire.

The Sapphire Energy Inc. Solution
We source and test for DIY-friendly performance with professional-grade safety. Under the same 175 A load for ~30 minutes, our switch showed only a ~26°C rise (data point at 31 min = 51.1 °C from 24.2 °C start)—no discoloration, no burn hazard, no damaged insulation. (Note: The teardown photos in this article are from an actual unit we tested)
Thermal Evidence: Better Switch (30 minutes)


Why Our Switch Runs Cooler
- Tinned Copper Studs (M10 × ~25 mm) High conductivity + corrosion resistance.
- Precision Contact Geometry Even, low-resistance mating—no crude “bump” bar.
- Quality Hardware Strong internal spring for best contact pressure
- IP64 with Double O-Rings Splash resistance and seals make it suitable for outdoor/marine use, but also prevent debris from entering and interfering with the contact points.
- Integrated Voltmeter Voltage readout at the handle for easy indication of system function.
- Current Capability 250 A continuous, 300 A short-term. (Perfect for most LiFePO₄ BMS output ratings)
- DIY-Friendly, Safety-First Built to empower DIYers without compromising safety.
Quick Comparison: Budget Switch vs. Sapphire Energy Switch
| Aspect | Budget Disconnect Switch | Sapphire Energy Switch |
|---|---|---|
| Studs | Low-grade metal studs with poor conductivity | Tinned copper studs (M10 × ~25 mm) |
| Nuts & Hardware | Cheap alloys; inconsistent lug contact; High Resistance | High-quality conductive hardware for solid seating |
| Internal Contact | Contact bar with small bumps (uneven contact) | Precision contact point for low, stable resistance |
| Heat Under Load (175 A) | ≈90°C temperature rise after only 12 min to 106.8 °C (test stopped) | ≈25–30 °C rise after ~30 min (31 min ≈ 51.1 °C final temperature) |
| Impact on Cables | Insulation discoloration; burn hazard; excessive heat transfer to nearby connected equipment. | No cable damage; safer to service |
| Construction | ABS plastic body; single O-ring | ABS & nylon heat-resistant body; double O-rings; IP64; panel mount gasket included |
| Features | ON/OFF only | ON/OFF + integrated voltmeter |
| Use Case | Low current applications ONLY. Not suited for high-current DIY systems |
Designed for LiFePO₄ & lead-acid banks; DIY-friendly |
The Bottom Line
A disconnect switch should protect you—not put you at risk. The difference between a budget unit and a properly engineered copper-based design is the difference between overheating and potential fire hazards and safe, reliable operation.
Pair that with quality cables, and lugs, and you'll have a long lasting, worry free electrical system.
Upgrade to a Safer Disconnect Switch
Run cooler under load with tinned-copper studs, precision contacts, IP64 sealing, and a built-in voltmeter—ideal for DIY LiFePO₄ and lead-acid banks.